The Complete Guide to Decorative Throw Pillows: 200+ Styling Ideas, DIY Projects & Pinterest-Worthy Combinations
Transform any room with perfectly curated pillow arrangements—from color coordination secrets to budget-friendly DIY covers
If you’ve ever scrolled through Pinterest wondering how designers create those effortlessly styled spaces with perfectly coordinated throw pillows while yours somehow always look… off—you’re not alone. The truth is, decorative pillows are both the easiest and trickiest element of interior design. Get them right, and your entire room feels pulled together, cozy, and magazine-worthy. Get them wrong, and even the most expensive furniture looks unfinished.
This comprehensive guide breaks down everything you need to know about throw pillow styling, from the mathematical formulas designers use for pattern mixing to no-sew DIY cover tutorials that’ll save you hundreds of dollars. Whether you’re hunting for cute throw pillows to refresh your living room, planning funky combinations for a bedroom makeover, or searching for pillow ideas that actually work in real life (not just in staged photos), you’ll find actionable strategies, Pinterest-worthy inspiration, and honest shopping recommendations.
We’ll cover throw pillow combinations that work for every room, decode the secrets behind viral pillow arrangements, teach you how to make DIY pillow covers without breaking your budget, and reveal why certain pillow cases and covers outperform others. By the end, you’ll understand not just what looks good, but why it looks good—and how to recreate those Pinterest-perfect moments in your own space, regardless of your budget or skill level.
Pillow Basics & Sizing: The Foundation of Great Design
Before diving into styling, you need to understand the anatomy of a well-designed pillow arrangement. Most people fail at pillow styling not because they lack taste, but because they don’t know the fundamental size ratios and proportions that make arrangements feel balanced rather than chaotic.
Standard Throw Pillow Sizes Explained
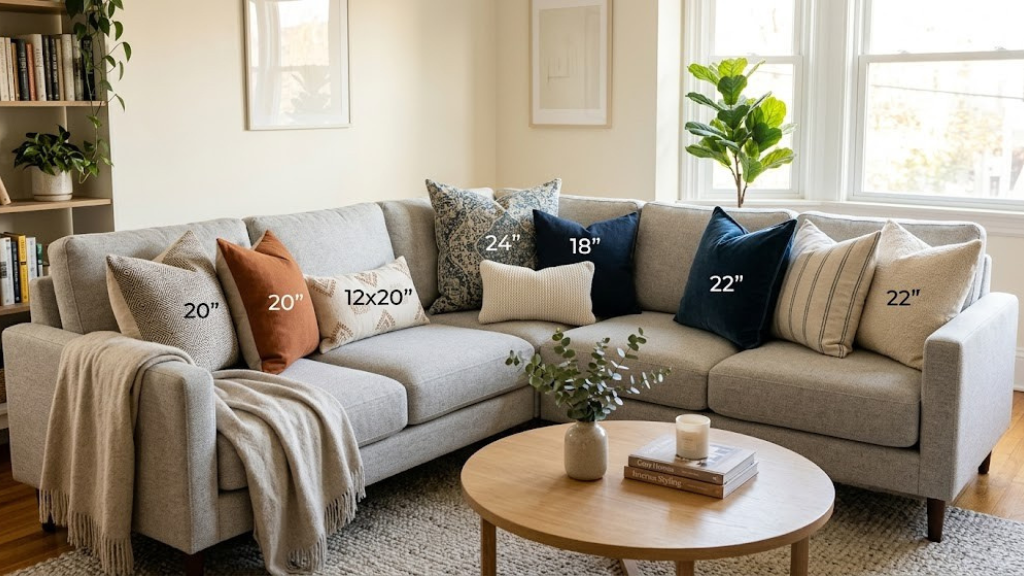
Unlike sleeping pillows (which come in standard, queen, and king), decorative throw pillows follow their own sizing conventions. Here’s the breakdown of the most common sizes and when to use each:
| Size | Best Uses | Visual Weight | Price Range |
|---|---|---|---|
| 12×20″ (Small Lumbar) | Accent layer, chair arms, small spaces | Low—adds detail without bulk | $8-25 (cover only) |
| 14×24″ (Standard Lumbar) | Front layer on couches, reading nooks | Medium—provides horizontal balance | $12-35 |
| 18×18″ | Bedroom accents, smaller chairs | Medium—compact but visible | $10-30 |
| 20×20″ | Main couch layer, bed accents | High—versatile workhorse size | $15-45 |
| 22×22″ | Back layer on couches, statement pieces | High—creates substantial presence | $18-50 |
| 24×24″ (Euro Square) | Bed backdrops, oversized couches | Very High—anchors arrangements | $20-60 |
| 26×26″ (Oversized Euro) | King beds, sectional corners | Maximum—bold statement | $25-75 |
The “Size-Up” Rule for Fullness
Here’s a professional secret that instantly elevates pillow arrangements: always buy pillow inserts that are 2 inches larger than your covers. This means:
- For an 18×18″ cover, buy a 20×20″ insert
- For a 20×20″ cover, buy a 22×22″ insert
- For a 22×22″ cover, buy a 24×24″ insert
The overstuffed look prevents that sad, deflated pillow syndrome and creates the plump, luxurious appearance you see in styled photography. The insert should strain slightly against the cover fabric, eliminating corner gaps and creating crisp edges. This technique works for square pillows; for lumbar shapes, use exact sizing or size up by 1 inch maximum to avoid overstretching.
💡 Pro Tip: The 2-4-2 Sizing Formula
For a balanced three-layer couch arrangement, use this progression: 2 large pillows (22″ in back corners), 4 medium pillows (20″ in middle positions), and 2 accent pillows (lumbar or 18″ in front). This creates visual rhythm through repetition while maintaining variety through size gradation. The formula works because it follows the design principle of odd numbers within each size category while creating even symmetry across the whole composition.
Insert Types: Down vs. Down-Alternative vs. Polyester
The insert you choose dramatically affects how your pillows look and feel, regardless of how beautiful the cover is. Here’s the honest breakdown:
Down Inserts (Feather + Down Mix)
Best for: High-traffic areas, frequent fluffing, luxury feel
Pros: Incredibly soft, molds to your body, maintains loft with daily fluffing, long lifespan (5-10 years)
Cons: Expensive ($30-80 per insert), requires daily fluffing, not hypoallergenic, can poke through thin covers
Reality check: Worth the investment for main living room pillows you interact with daily, but overkill for purely decorative bedroom arrangements you barely touch.
Down-Alternative Inserts (Synthetic Microfiber)
Best for: Allergy sufferers, moderate budgets, balanced performance
Pros: Hypoallergenic, machine washable, maintains shape well, mimics down feel, mid-range price ($15-35)
Cons: Compresses faster than down (2-3 year lifespan), can feel slightly synthetic, loses loft in humid climates
Reality check: The sweet spot for most homes—90% of the down experience at 50% of the cost.
Polyester Fiber-Fill Inserts
Best for: Outdoor pillows, kids’ rooms, temporary styling
Pros: Very affordable ($8-15), fully washable, quick-drying, doesn’t attract dust mites
Cons: Flattens quickly (6-12 months), lumpy texture, cheap feel, difficult to refluff
Reality check: Fine for seasonal pillows you swap out frequently or outdoor spaces exposed to weather, but don’t expect them to maintain their shape through a full year of daily use.

Premium Down-Alternative Pillow Inserts
Set of 4 (20×20″ + 22×22″) hypoallergenic inserts with corner tabs to prevent shifting. Machine washable, maintains loft for 3+ years.
Shop Inserts on Amazon →Understanding Pillow Cover Closures
The closure mechanism affects both aesthetics and practicality. Here’s what you need to know about each type:
Hidden Zipper Closures: The gold standard for decorative pillows. Zippers sewn into the seam create an invisible closure that won’t disrupt patterns. Look for zippers at least 14 inches long for easy insert changes. Downside: zippers can break after repeated washing, and cheap zippers snag fabric.
Envelope Closures: Fabric overlaps on the back create a no-hardware option. Budget-friendly and easy to sew yourself, but inserts can peek through the gap if not sized properly. Best for low-traffic decorative pillows rather than daily-use cushions.
Button or Tie Closures: Decorative but high-maintenance. Buttons add visual interest but become annoying when you’re removing covers for washing. Ties (ribbon, fabric strips) work better for rustic or boho styles but rarely stay secure long-term.
Velcro Closures: Practical for DIY projects and kid-friendly spaces, but velcro weakens over time and catches on delicate fabrics during washing. Not recommended for anything you plan to keep long-term or mix with other fabrics in the laundry.
Color Coordination Secrets: The Psychology Behind Perfect Palettes
Color coordination is where most DIY pillow styling falls apart. You might love each individual pillow, but together they create visual chaos rather than cohesion. Professional designers don’t guess at color combinations—they follow established color theory principles that you can learn and apply immediately.
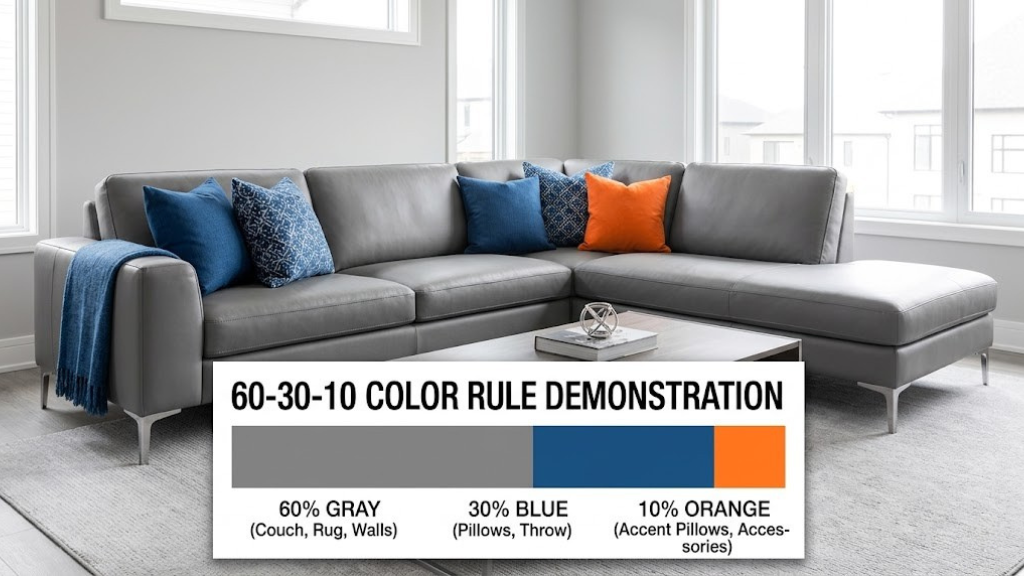
The 60-30-10 Rule (The Foundation)
This is the single most important color principle in interior design, and it applies perfectly to pillow arrangements:
- 60% Dominant Color: Your main neutral or base color (typically matching your couch, walls, or bedding). This creates visual stability and prevents sensory overload. Examples: cream, gray, navy, charcoal, beige.
- 30% Secondary Color: A complementary or analogous color that adds interest without competing with the dominant shade. This bridges your base color and accent. Examples: if dominant is gray, secondary might be soft blue or muted green.
- 10% Accent Color: Your bold pop—the color that catches the eye and adds personality. This is where you can take risks with vibrant hues, metallics, or high-contrast choices. Examples: mustard, coral, emerald, black.
In practice, for a 5-pillow couch arrangement: 3 pillows in your dominant color (60%), 1-2 pillows incorporating your secondary color (30%), and 1 pillow with your accent color (10%). This ratio prevents any single color from overwhelming the composition while maintaining visual hierarchy.
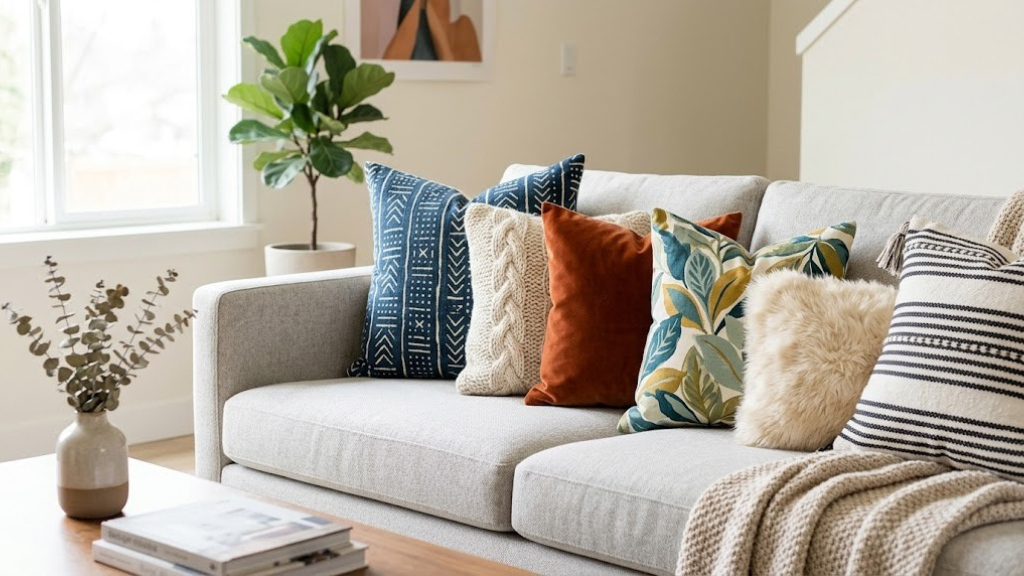
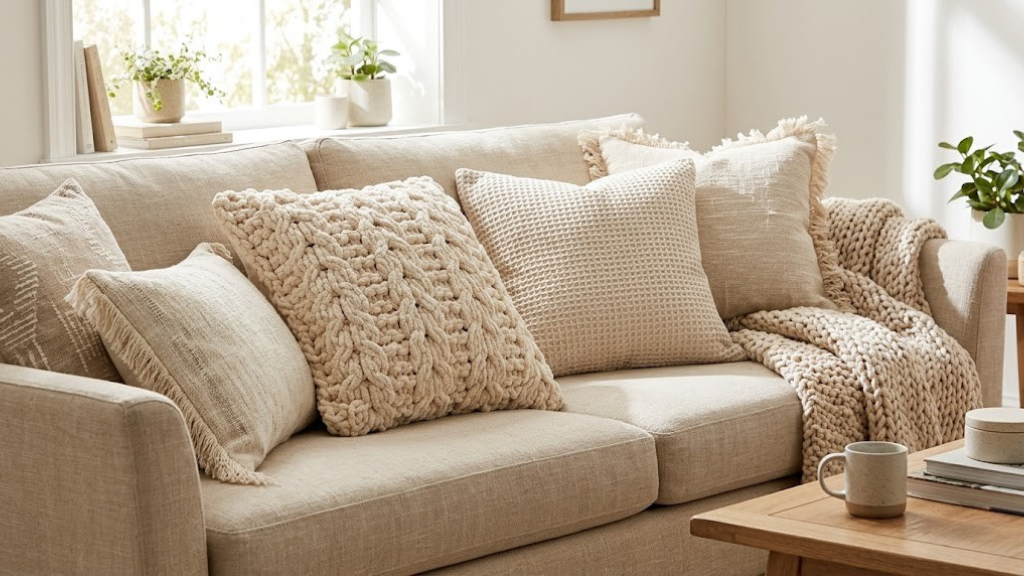
🎨 Real-World Example: Gray Couch Transformation
Starting point: Medium gray linen couch
60% (Dominant): 3 pillows in gray/cream patterns—one chunky gray knit, one cream geometric, one gray-on-cream stripe
30% (Secondary): 2 pillows in dusty blue—one solid blue velvet, one blue/cream floral
10% (Accent): 1 lumbar pillow in burnt orange with geometric pattern
Why it works: The gray anchors to the couch, blue adds coolness without jarring the palette, and orange provides warmth and a focal point. The eye travels from gray → blue → orange → back to gray, creating a complete visual loop.
Monochromatic Layering (For Beginners)
If color mixing intimidates you, start with a monochromatic palette—multiple shades of the same color family. This approach is nearly foolproof and looks sophisticated with minimal effort:
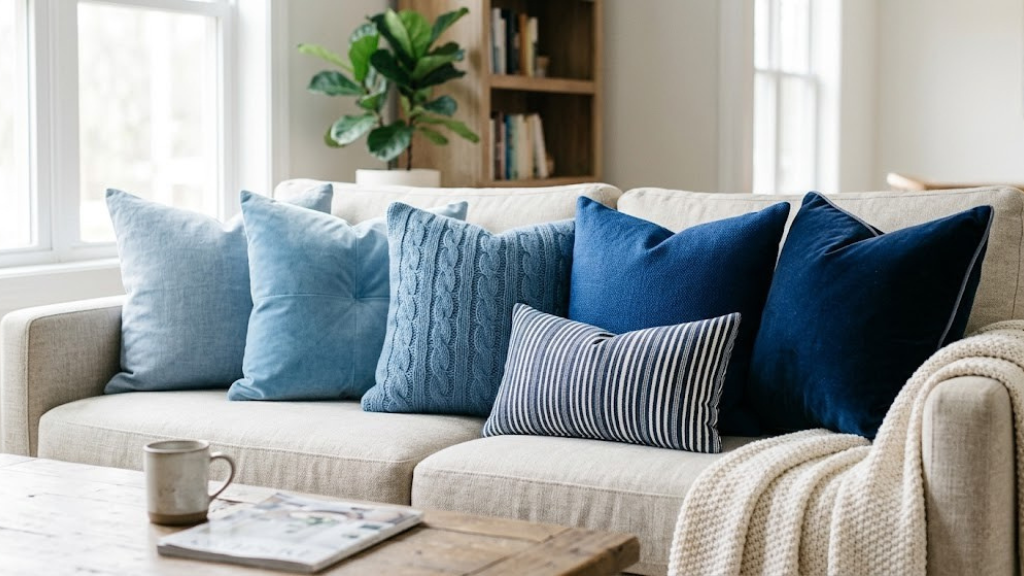
Example 1: Blue Spectrum
Light blue linen → medium blue cotton → navy velvet → indigo print → pale blue-gray texture. The variation in shade creates depth, while different textures (more on this later) prevent monotony.
Example 2: Neutral Gradient
Ivory → cream → tan → camel → chocolate brown. This warm neutral progression works in virtually any space and pairs with any accent color you add later.
The secret to successful monochromatic styling: vary your tones by at least 2-3 shades. If everything is too similar, it reads as lazy or unintentional. You want clear differentiation—light, medium, dark—so each pillow registers as a distinct layer.
Complementary Color Schemes (For Drama)
Complementary colors sit opposite each other on the color wheel: blue/orange, red/green, purple/yellow. These combinations create high visual impact and energy. Use them when you want a space to feel vibrant, youthful, or playful:
- Navy + Rust/Burnt Orange: Classic, warm, works in both modern and traditional spaces. The deep blue grounds the arrangement while rust adds earthy warmth.
- Sage Green + Dusty Rose/Mauve: Softer complementary pair, trending heavily on Pinterest. Feels botanical, romantic, and calming.
- Plum/Eggplant + Mustard Yellow: Bold, unconventional, perfect for eclectic or maximalist styles. Requires confidence but photographs beautifully.
The key to making complementary colors work: use unequal proportions (never 50/50). Apply the 60-30-10 rule with one complement as your secondary and the other as your accent. For navy and rust, you might do 60% cream/neutral base, 30% navy, 10% rust. This prevents the colors from fighting for dominance.
Analogous Color Schemes (For Cohesion)
Analogous colors sit next to each other on the color wheel: blue/green/teal, orange/red/pink, yellow/green/lime. These create harmonious, flowing palettes that feel naturally cohesive:
Ocean-Inspired: Navy → teal → seafoam → aqua. This progression feels coastal and calming, perfect for bedrooms or coastal-themed living rooms.
Sunset Gradient: Coral → peach → blush → cream. Warm, feminine, and Instagram-worthy. Works beautifully in spaces with natural wood tones.
Forest Palette: Emerald → olive → sage → moss green. Earthy, grounding, and on-trend for 2026. Pair with cream or tan neutrals to prevent it from feeling too dark.
Seasonal Color Swapping Strategy
Rather than buying entirely new pillow sets for each season, invest in a neutral base and swap accent colors:
| Season | Base Neutrals (Keep Year-Round) | Accent Colors (Swap) | Mood |
|---|---|---|---|
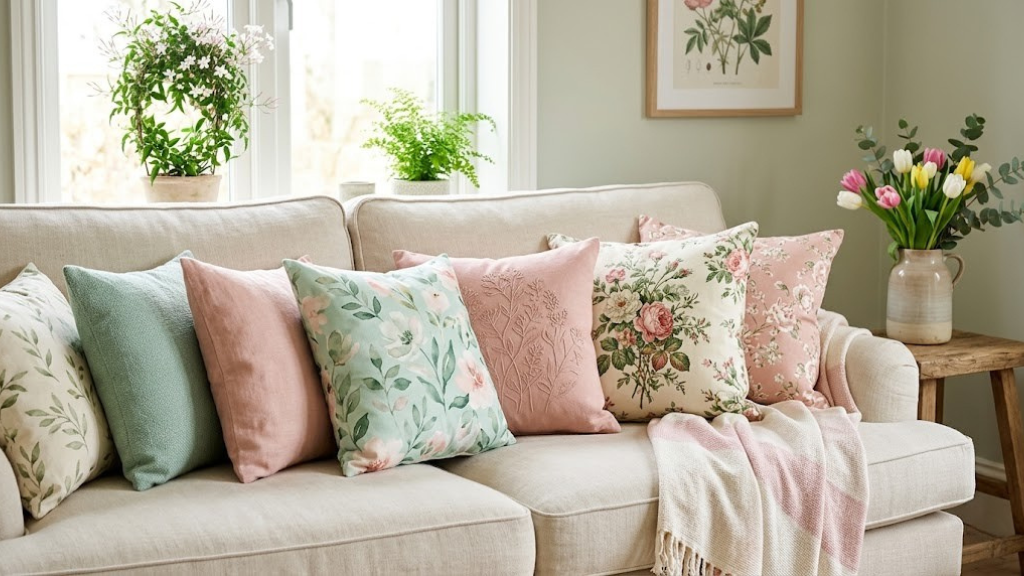
| Spring | Cream, white, light gray | Blush pink, mint green, soft yellow | Fresh, airy, renewal |
| Summer | White, natural linen, sand | Coral, turquoise, citrus orange | Vibrant, coastal, energetic |
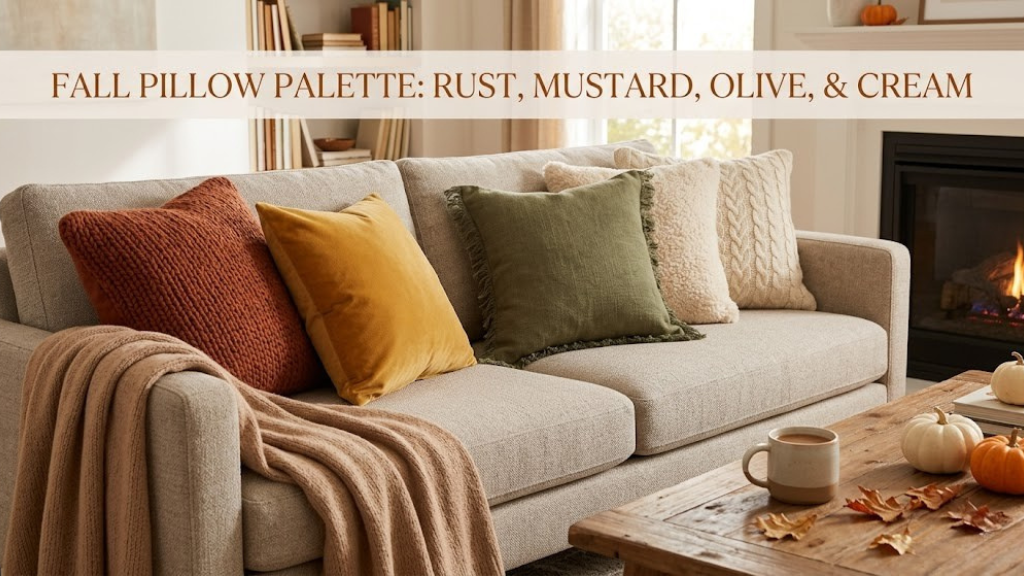
| Fall | Taupe, camel, warm gray | Rust, mustard, burgundy, olive | Cozy, warm, grounding |
| Winter | Charcoal, deep navy, cream | Emerald, burgundy, icy blue, silver | Sophisticated, moody, luxurious |
This strategy means you only need to purchase 2-3 new accent pillow covers per season (at $15-30 each) rather than replacing your entire collection. Your neutral base stays consistent, providing continuity while accent swaps keep your space feeling current and intentional.

4-Pack Seasonal Pillow Cover Set
Interchangeable covers in coordinated seasonal palettes. Zipper closures, pre-shrunk fabric, fits standard 18×18″ and 20×20″ inserts.
Browse Seasonal Sets →Metallic Accents: Gold, Silver, or Copper?
Metallics add glamour without introducing a new color into your palette. Here’s how to choose:
Gold/Brass: Warm-toned, pairs with cream, blush, navy, emerald, burgundy. Feels traditional, luxurious, and elegant. Best in rooms with warm lighting (soft white bulbs).
Silver/Chrome: Cool-toned, pairs with gray, blue, white, purple, icy pastels. Feels modern, sleek, and minimalist. Best in rooms with cool lighting (daylight bulbs) or abundant natural light.
Copper/Rose Gold: Warm but contemporary, pairs with gray, navy, olive, dusty pink. Feels trendy but accessible. Works in mixed-temperature spaces (rooms with both warm and cool tones).
Pro tip: stick to one metallic per room to avoid competing finishes. If your lamp bases are brass, use gold-accented pillows. If your hardware is brushed nickel, go silver. Mixing metals can work in eclectic spaces but requires advanced styling knowledge to pull off cohesively.
Pattern Mixing Formulas: The Math Behind Stunning Combinations
Pattern mixing separates amateur pillow styling from professional-looking arrangements. Most people either avoid patterns entirely (boring) or throw random prints together (chaotic). The solution isn’t to wing it—it’s to follow proven formulas that designers use to create visually complex yet balanced compositions.
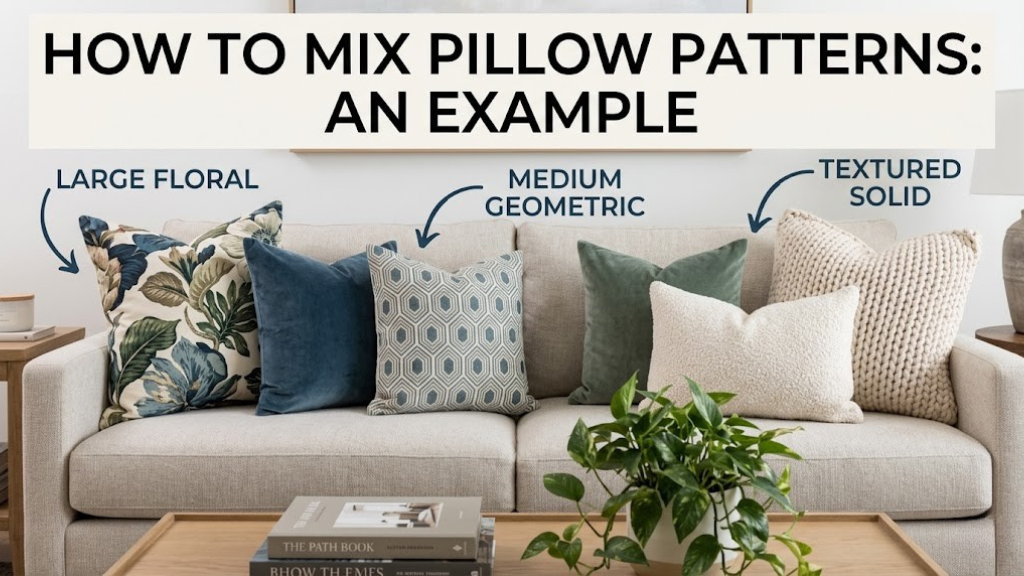
The Three-Pattern Rule
This is the industry-standard approach: combine three distinct pattern types in different scales, all sharing at least one color from your palette. Here’s the breakdown:
Pattern 1: Large-Scale Dominant Pattern (The Star)
This is your focal point—the pattern you notice first. Use it on 1-2 pillows maximum. Examples:
- Large-scale florals (blooms 6+ inches wide)
- Bold geometric shapes (hexagons, large stripes, oversized chevrons)
- Dramatic animal prints (zebra, leopard with 3+ inch spots)
- Abstract painterly designs with high contrast
Placement: Middle layer on couches, center position on beds. This pattern needs visibility but shouldn’t overwhelm.
Pattern 2: Medium-Scale Supporting Pattern (The Bridge)
This pattern connects your large print to your small details. It should share colors with both the large pattern and your solid/textured pillows. Use it on 1-2 pillows. Examples:
- Medium florals (2-4 inch blooms)
- Classic patterns (gingham, plaid, houndstooth, windowpane checks)
- Moderate geometric repeats (quatrefoil, diamond grids, smaller chevrons)
- Tonal damask or medallion prints
Placement: Corner positions on couches, second layer on beds. This pattern provides rhythm and visual flow.
Pattern 3: Small-Scale Accent Pattern or Texture (The Anchor)
This is your detail layer—often so subtle it reads almost as a textured solid from a distance. Use it on 1-3 pillows. Examples:
- Tiny dots, mini stripes, small-scale geometric grids
- Tone-on-tone patterns (cream embroidery on cream fabric)
- Textured weaves (boucle, chunky knits, cable patterns)
- Subtle prints (delicate line drawings, watercolor washes)
Placement: Throughout the arrangement. These ground the composition and prevent visual fatigue.
📐 Formula in Action: Navy + Rust Couch
Large Pattern: 1 pillow with large-scale rust and cream floral (8-inch blooms)
Medium Pattern: 2 pillows with navy/cream buffalo check (2-inch squares)
Small Pattern/Texture: 2 cream cable-knit textured pillows + 1 navy velvet solid
Why it works: The floral creates a focal point, the buffalo check bridges floral and solid, and textures add sophistication without competing. All three share cream as a unifying color.
Scale Variation: The Non-Negotiable Rule
Never combine patterns of the same scale—this is the most common mistake. Two medium florals together look confused. Two small geometrics feel busy. The solution: always vary pattern scale dramatically:
✓ Works
- Large floral + medium stripe + small dot
- Oversized geometric + classic plaid + textured solid
- Bold animal print + windowpane check + cable knit
- Abstract painterly + gingham + linen weave
✗ Fails
- Medium floral + medium paisley (too similar)
- Large stripe + large chevron (competing diagonals)
- Small polka dot + small gingham (visually noisy)
- Abstract print + busy geometric (chaotic)
The “One Wild Card” Approach
If three patterns feel overwhelming, use this safer alternative: one statement pattern + coordinating solids and textures. This works especially well for minimalist or Scandinavian-inspired spaces:
Example Setup:
1 pillow with bold black-and-white geometric pattern (the wild card)
2 solid cream linen pillows
2 solid charcoal velvet pillows
1 cream chunky knit pillow for texture
The single pattern provides visual interest without overwhelming. The solids in coordinating colors create balance. The textured knit adds dimension without introducing another pattern. This is essentially pattern mixing for people who think they can’t mix patterns—it’s a training-wheels approach that still looks intentional and sophisticated.
Stripe Mixing: The Secret Weapon
Stripes are the most versatile pattern in pillow styling because they work with nearly everything. Here’s how to use them strategically:
Horizontal Stripes: Make rooms feel wider. Use on rectangular pillows to enhance the horizontal effect. Pair with vertical patterns or florals to create directional contrast.
Vertical Stripes: Make spaces feel taller. Use on square pillows on low-profile couches or beds to add perceived height. Pair with circular patterns (dots, florals) for shape contrast.
Diagonal Stripes (Chevron): Add energy and movement. Use sparingly—one chevron pillow maximum per arrangement. Pair with horizontal or vertical lines to stabilize the dynamic angle.
Stripe Width Mixing: You can mix stripe widths if you keep the colors consistent. Example: 1-inch navy/cream stripe + 3-inch navy/cream stripe + 1/4-inch navy/cream pinstripe. The varying widths create rhythm while the consistent colors maintain cohesion.

Curated Pattern-Mixing Pillow Sets
Pre-coordinated 6-pack sets with large, medium, and small-scale patterns already balanced. Takes the guesswork out of mixing.
Shop Pattern Sets →Avoiding Pattern Overload: The Rest Space Principle
Even in pattern-heavy arrangements, you need visual rest spaces—areas where the eye can relax. This is where solids and subtle textures become crucial. The ratio should be:
- Bold Pattern Lovers: 60% patterns, 40% solids/textures
- Moderate Pattern Users: 50/50 split
- Pattern-Averse Decorators: 30% patterns, 70% solids/textures
If you’re unsure where you fall, start conservatively and add patterns over time. It’s easier to add visual complexity than to dial it back once you’ve committed to bold prints.
Cultural and Global Patterns: Mixing With Intention
Global patterns (ikat, suzani, tribal prints, batik) add worldly sophistication but require thoughtful mixing to avoid cultural appropriation or kitsch:
Do: Pair one authentic global pattern with neutral solids and subtle textures. Let it be the star. Example: one suzani pillow + cream linen + gray velvet.
Don’t: Mix multiple cultural patterns from different regions (Moroccan + Japanese + Scandinavian) unless you’re going for a deliberate maximalist, collected-over-time vibe. Even then, it requires advanced styling skills.
Context matters: A single suzani or ikat pillow reads as intentional and collected. Five different tribal prints read as costume-y or Anthropologie clearance rack. Quality over quantity.
Texture & Fabric Layering: Adding Dimension Without Color
Texture is the most underutilized tool in pillow styling. While everyone focuses on color and pattern, texture adds a tactile dimension that makes spaces feel lived-in and luxurious. It’s especially powerful in monochromatic or neutral schemes where texture becomes the primary source of visual interest. Just as you can explore different blanket textures for comfort, throw pillows benefit immensely from varied fabric choices.
Understanding Texture Categories
Fabrics fall into four textural categories. A well-balanced pillow arrangement includes at least two, ideally three:
1. Smooth/Flat Textures (The Foundation)
These fabrics have minimal surface variation and clean lines:
- Cotton: Crisp, matte finish, wrinkle-prone but breathable and affordable
- Linen: Natural slub texture, casual elegance, softens with washing
- Velvet: Smooth but dimensional—light hits it differently at angles
- Silk/Satin: High sheen, formal, slippery (slides around on couches)
Use for: 40-50% of your arrangement. These provide visual calm and highlight textured companions.
2. Plush/Soft Textures (The Comfort Layer)
Fabrics that invite touch and add cozy warmth:
- Chenille: Velvety, slightly fuzzy, catches light beautifully
- Faux Fur: Ultra-soft, dramatic, seasonal (fall/winter)
- Sherpa/Fleece: Budget-friendly plush, casual, pet-friendly
- Minky: Silky-soft, modern, great for kid-friendly spaces
Use for: 20-30% of your arrangement. These add warmth but can overwhelm if overused.
3. Woven/Structured Textures (The Interest Layer)
Fabrics with visible weave patterns or dimensional structure:
- Cable Knit: Chunky, cozy, three-dimensional raised patterns
- Boucle: Looped yarn creates nubby surface, trending in 2026
- Waffle Weave: Grid texture, casual, absorbs light to reduce shine
- Jute/Natural Fiber: Rustic, organic, pairs with bohemian styles
Use for: 20-30% of your arrangement. These are conversation starters and focal points.
4. Embellished/Detailed Textures (The Accent Layer)
Fabrics with applied details or surface treatments:
- Embroidered: Adds pattern through stitching, often tone-on-tone
- Beaded/Sequined: Glamorous, formal, catches light dramatically
- Tufted: Raised dots or patterns, tactile and vintage-inspired
- Macrame/Fringe: Bohemian, textural edges, movement
Use for: 10-20% maximum. These are statement pieces—one per arrangement is usually enough.
🧶 Texture Formula for All-Neutral Spaces
When working with a monochromatic neutral palette (all creams, all grays, all taupes), texture becomes your primary design tool. Use this ratio:
- 50% smooth (linen, cotton, or velvet in your base neutral)
- 30% woven (cable knit, boucle, or waffle weave in slightly different neutral shade)
- 20% plush or embellished (faux fur, chenille, or beaded detail in accent neutral)
Example: Cream linen + cream cable knit + ivory faux fur + natural jute + cream embroidered = visually rich despite being all neutral.
Seasonal Texture Swapping
Just as you swap colors seasonally, textures should shift to match temperature and light quality:
Spring/Summer Textures:
Lightweight, breathable, light-reflective. Prioritize cotton, linen, lightweight knits, silk blends. These feel cool to touch and suit warmer weather. Colors stay light (whites, creams, pastels) and textures should feel crisp and airy.
Fall/Winter Textures:
Heavier, plush, light-absorbing. Prioritize velvet, chenille, chunky knits, faux fur, boucle. These feel warm to touch and suit colder months. Colors deepen (charcoals, navy, burgundy) and textures should feel substantial and cozy. Similar to how you might choose cozy blankets for your living room, winter pillow textures should enhance warmth and comfort.
| Texture Type | Best Season | Light Interaction | Maintenance Level |
|---|---|---|---|
| Linen | Spring/Summer | Matte, absorbs light | Low—wrinkles are expected |
| Velvet | Year-round (lighter in summer) | Reflective, changes with angle | Medium—vacuum or brush regularly |
| Chunky Knit | Fall/Winter | Dimensional, creates shadows | High—snags easily, hand wash |
| Faux Fur | Fall/Winter | Diffuses light, soft glow | High—sheds, requires brushing |
| Cotton | Year-round | Matte, neutral | Low—machine washable |
| Boucle | Year-round (trending) | Textured, subtle dimension | Medium—professional clean recommended |
Mixing Sheen Levels
Sheen—how much light a fabric reflects—creates subtle contrast even within the same color. Mix sheen levels for sophistication:
- Matte: Cotton, linen, most knits (absorbs light, casual)
- Low Sheen: Velvet, chenille, brushed fabrics (subtle reflection, sophisticated)
- Medium Sheen: Satin weaves, some silks (noticeable reflection, formal)
- High Sheen: Silk, satin, metallics (dramatic reflection, glamorous)
A balanced arrangement might include: 60% matte (linen, cotton), 30% low sheen (velvet), 10% medium or high sheen (one silk or metallic pillow as accent). This creates depth through light variation without feeling mismatched.
Budget Texture Hacks
High-end textures are expensive, but you can fake luxury with smart substitutions:
💰 Budget Wins
- Faux fur instead of real fur ($15 vs. $200+)
- Cotton velvet instead of silk velvet ($20 vs. $80)
- Acrylic cable knit instead of wool ($18 vs. $65)
- Linen-look polyblend instead of 100% linen ($12 vs. $45)
⚠️ Where Not to Skimp
- Pillow inserts (cheap fill goes flat in weeks)
- Zipper quality (broken zippers ruin covers)
- White fabrics (cheap whites yellow quickly)
- High-traffic pillows (invest in durability for main couch)
The reality: most guests can’t tell faux fur from real, or cotton velvet from silk, especially when they’re arranged together and not scrutinized individually. Save money on covers, invest in quality inserts.

Mixed Texture Pillow Cover Collection
6-pack set featuring velvet, linen, cable knit, and boucle textures in coordinated neutrals. Instant dimension for monochromatic spaces.
Shop Texture Bundles →Styling Pillows on Couches: Room-by-Room Formulas
Couch pillow styling follows different rules depending on your sofa type, room function, and lifestyle. What works for a formal living room won’t work for a family room with toddlers. Here are proven formulas for every scenario.
The Standard 3-Seat Sofa: The 5-7 Pillow Formula
This is the most common setup. The goal: create symmetry with variation.
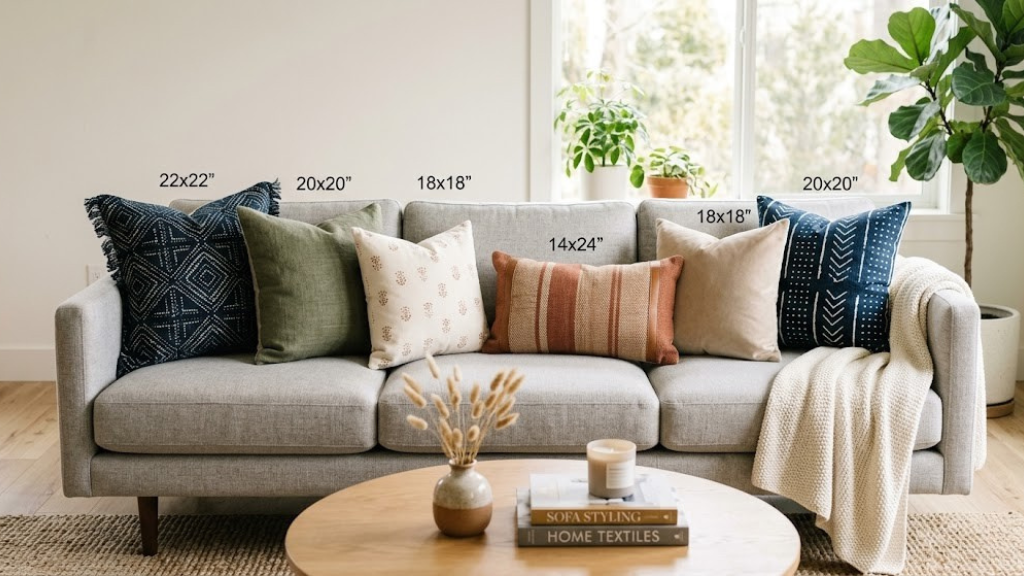
Option 1: Symmetrical 5-Pillow Arrangement (Classic)
- Position 1 & 5 (Corners): Two 22×22″ pillows in dominant color/pattern
- Position 2 & 4 (Inner corners): Two 20×20″ pillows in secondary color/pattern
- Position 3 (Center): One 12×20″ lumbar in accent color
Why it works: Symmetrical corners create visual bookends. Smaller middle pillows create a pyramid effect. Lumbar breaks the square-pillow monotony and adds horizontal balance.
Option 2: Asymmetrical 7-Pillow Arrangement (Layered)
- Back Layer: Two 22×22″ pillows (corners)
- Middle Layer: Two 20×20″ pillows (offset from corners)
- Front Layer: Two 18×18″ pillows + one 12×20″ lumbar
Why it works: Three layers create depth. Odd number (7) feels more organic than even. Varied sizes prevent regimented look. This is the “designed” approach seen in staging and magazines.
Option 3: Minimal 3-Pillow Arrangement (Modern)
- Position 1 & 3: Two 22×22″ pillows in corners
- Position 2: One 14×24″ lumbar in center
Why it works: Clean, uncluttered, functional. The lumbar provides lower back support for actual sitting. Perfect for minimalist or Scandinavian aesthetics.
🛋️ The “Actually Sit Here” Test
Before finalizing your arrangement, sit on the couch as you normally would. If you have to move 4+ pillows to sit comfortably, you have too many. Pillows should enhance livability, not hinder it. For family rooms and high-traffic spaces, lean toward the minimal 3-5 pillow approach. Save the 7+ pillow layering for formal living rooms or spaces styled more for looking than living.
Sectional Sofas: The Corner Problem
Sectionals have unique challenges—specifically, the corner seat where two sections meet. Here’s how to style without creating a pillow avalanche:
L-Shaped Sectional Formula
- Long side: 3-5 pillows using the standard sofa formula (above)
- Short side: 2-3 pillows, smaller overall (20×20″ max)
- Corner seat: One 18×18″ or 20×20″ pillow, NOT against the corner joint but placed toward the front edge
Why this works: The corner pillow prevents the awkward gap but doesn’t interfere with sitting. Smaller pillows on the short side maintain proportion. Avoid oversized pillows on chaise portions—they slide into the seam and look messy.
U-Shaped Sectional Formula
- Each outer arm: 2 pillows (one 22×22″, one 20×20″)
- Center section: 1 lumbar or 2 smaller pillows
- Corner seats: 1 pillow each, positioned forward
Total: 7-9 pillows for a large U-shaped sectional. Any more and it becomes a pillow storage facility rather than seating.
Loveseats and Small Sofas: The 3-5 Pillow Rule
Smaller sofas need fewer, smaller pillows to avoid overwhelming the space:
Loveseat (2-Seat) Formula
- Corners: Two 20×20″ pillows (not 22×22″—too large)
- Center: One 12×20″ lumbar OR one 18×18″ accent
Alternative: Two 20×20″ corners + two 14×14″ accents for a 4-pillow layered look.
Apartment-Size Sofa (68-72″ wide)
- Follow the 5-pillow formula but use 20×20″ as your largest size
- Avoid 22×22″ or larger—they read as oversized and unbalanced
Leather and Faux-Leather Sofas: The Slip Problem
Smooth leather surfaces don’t grip pillow backs, causing constant sliding. Solutions:
- Use textured backs: Choose pillows with velvet, linen, or canvas backs (even if the front is smooth) to create friction
- Add shelf liner: Cut non-slip shelf liner to 18×18″ squares and place under pillows—invisible and effective
- Size up inserts: Overstuffed pillows wedge into place better than loosely filled ones
- Angle backward: Lean pillows 10-15 degrees back against the sofa back rather than standing upright
The reality: leather sofas will never hold pillows as well as fabric sofas. Embrace a more minimal arrangement (3-4 pillows max) and accept some readjustment as part of ownership.
Color Matching Your Couch
Your couch color dictates your pillow strategy. Here’s the formula for common couch colors:
Gray Couch (Most Common)
Warm gray: Pair with warm neutrals (cream, camel, blush, rust, mustard)
Cool gray: Pair with cool tones (white, navy, blue-gray, mint, lavender)
Charcoal gray: High contrast works—cream, white, metallics, bright jewel tones
Avoid: Matching gray-on-gray unless you’re mixing textures heavily
Beige/Tan/Cream Couch
Best partners: Earth tones (rust, terracotta, olive, chocolate), soft blues, blush
Avoid: Yellow (reads as stained), matching beige (boring), orange (clashes with warm undertones)
Navy/Blue Couch
Best partners: Cream, white, gold metallics, coral, rust, soft pink
Avoid: Black (too dark together), purple (competes), red (too patriotic unless intentional)
White/Cream Couch
Best partners: Literally everything—this is your blank canvas
Strategy: Use pillows to introduce ALL your room’s accent colors
Reality check: White couches with kids or pets? Choose washable covers or resign yourself to frequent cleaning. Consider the practicality insights from washing delicate fabrics when selecting white pillow materials.
Black Couch
Best partners: Metallics (gold, silver), jewel tones (emerald, ruby, sapphire), white, cream
Avoid: Dark colors (navy, charcoal, brown—everything disappears), all-neutral (too cold)
Patterned/Printed Couch
Strategy: Pull ONE color from the couch pattern and use it as your pillow palette base
Avoid: Introducing new colors not present in the couch fabric
Best approach: 80% solids and textures, 20% pattern maximum (the couch is already busy)
Bed Pillow Arrangements: Layering from Sleep to Style
Bed pillow styling is less about comfort and more about creating a hotel-luxury focal point. Unlike couch pillows (which you interact with daily), bed pillows are primarily decorative—you remove them at night and reset them each morning. This means you can go bolder, bigger, and more layered than you would on seating.
The Standard Bed Pillow Layers (Back to Front)
Professional bed styling follows a specific layering order. Each layer serves a visual purpose:
Layer 1: Euro Shams (Background Layer)
Size: 26×26″ (standard euro)
Quantity: 2-3 for queen/full, 3 for king
Purpose: Create height and backdrop for smaller pillows
Styling: Stand upright against headboard, slight overlap acceptable
Fabric choice: This is where you can use your boldest pattern or richest texture—it’s the visual anchor
Layer 2: Sleeping Pillows in Shams (Functional Layer)
Size: Standard (20×26″), queen (20×30″), or king (20×36″)
Quantity: 2 for queen/full, 2-3 for king
Purpose: These are your actual sleeping pillows dressed in decorative shams
Styling: Overlap slightly in front of euro shams, standing upright
Fabric choice: Coordinate with euro shams but don’t match exactly—different shade or complementary pattern
Layer 3: Decorative Accent Pillows (Style Layer)
Size: 20×20″, 18×18″, or lumbar (12×20″, 14×24″)
Quantity: 1-3 pillows
Purpose: Add color pops, pattern contrast, or textural interest
Styling: Lean against sleeping pillows or lay horizontally in front
Fabric choice: This is your accent layer—introduce your boldest color or most interesting texture
| Bed Size | Euro Shams | Standard Shams | Accent Pillows | Total Count |
|---|---|---|---|---|
| Twin | 1-2 | 1 | 1 | 3-4 |
| Full | 2 | 2 | 1-2 | 5-6 |
| Queen | 2-3 | 2 | 1-2 | 5-7 |
| King | 3 | 2-3 | 2-3 | 7-9 |
| California King | 3 | 3 | 2-3 | 8-9 |
Alternative Arrangement Styles
The Minimal Modern (3-4 Pillows)
- 2 euro shams (matching or complementary solids)
- 2 sleeping pillows in simple shams (no decorative front)
- Optional: 1 lumbar accent
Best for: Scandinavian, minimalist, or Japanese-inspired bedrooms. Clean lines, easy daily reset.
The Luxe Hotel (8-10 Pillows)
- 3 euro shams (26×26″)
- 3 standard/queen shams
- 2 accent pillows (20×20″)
- 2 lumbar pillows (12×20″ or 14×24″)
Best for: Master suites, guest rooms you want to impress, Pinterest-worthy staging. Requires 5-10 minutes daily to arrange properly.
The Asymmetrical Stack (6-7 Pillows)
- 3 euro shams on one side, 2 on the other (creates diagonal line)
- 2 standard shams centered
- 1-2 accent pillows on the side with fewer euros
Best for: Modern eclectic, artistic spaces, breaking traditional symmetry. Requires good eye for balance.
🛏️ The Daily Pillow Reality Check
Be honest about your lifestyle before committing to an 8-pillow bed arrangement. If you hit snooze three times and rush out the door, those pillows will end up in a pile on the floor or tossed haphazardly on the bed. Options:
- Basket system: Keep a decorative basket at the foot of your bed. In the morning, toss all decorative pillows in the basket. At night, pull them out and arrange. 2-minute reset.
- Bench parking: If you have a bench at the foot of your bed, stack pillows there during sleep hours. In the morning, redistribute to the bed.
- Commit to minimal: If you know you won’t maintain it, stick to 3-4 pillows. A perfectly made simple bed looks better than a disheveled luxury bed.
Color Coordination on Beds
Bed pillow colors should coordinate with your duvet/comforter and bedroom walls. Here’s the hierarchy:
Primary color source: Your duvet cover—this is your largest bedroom textile
Secondary color source: Your walls—they frame everything
Tertiary color source: Curtains, rugs, or other large bedroom textiles
The formula:
- 60% of pillows should coordinate with duvet (same color family, different shades)
- 30% should introduce a complementary or analogous color
- 10% can be a wild card accent (metallics, bold contrast, pattern)
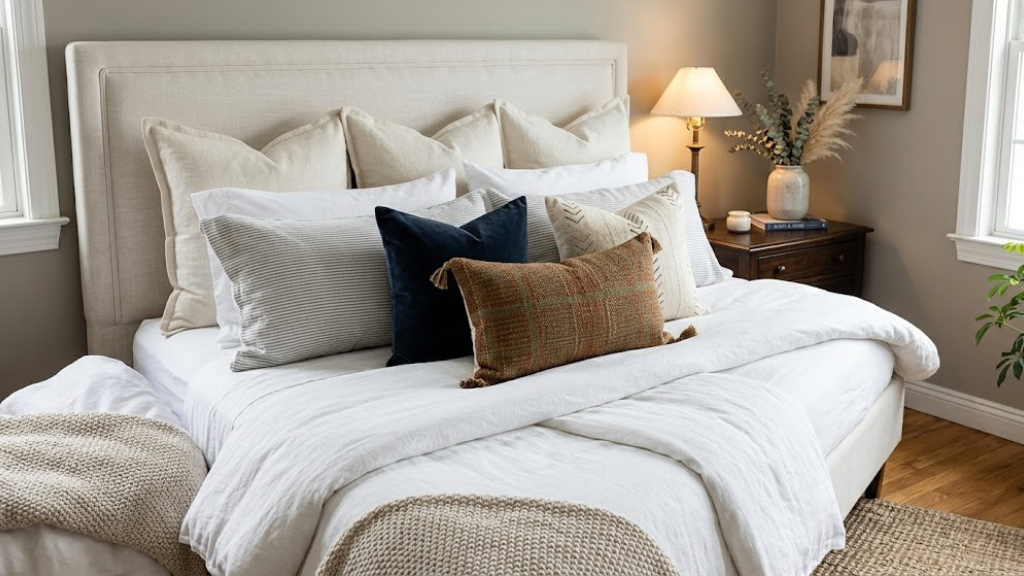
Example: White Duvet Coordination
Wall color: Pale gray
60% (Duvet coordination): White euro shams, cream textured pillows
30% (Wall coordination): Gray velvet or linen accents
10% (Wild card): Blush pink or gold metallic lumbar
The white duvet stays neutral, gray ties to walls, and blush/gold adds warmth and personality.
Kids’ and Guest Room Simplified Formulas
Kids’ Rooms (Ages 3-10)
Formula: 2-3 pillows maximum
Reasoning: Kids don’t arrange pillows—they toss them on the floor. Keep it simple with 1-2 sleeping pillows in fun patterned shams + 1 character or themed accent pillow.
Fabric choice: Machine washable only. Avoid delicate embellishments, faux fur (they’ll use it as a rag), or anything dry-clean only.
Tween/Teen Rooms (Ages 11-17)
Formula: 4-6 pillows (they want it to look styled but not fussy)
Reasoning: This age appreciates aesthetics and may actually maintain arrangements, especially if they’re Instagram-worthy.
Let them lead: Involve them in choosing colors and patterns. They’re more likely to maintain what they selected.
Guest Rooms
Formula: 5-6 pillows (looks intentional without being high-maintenance)
Reasoning: Guests should feel welcomed but not burdened by excessive decorative pillows.
Smart approach: 2 euro shams (these can stay on the bed even during use), 2 sleeping pillows in shams, 1-2 small accents guests can easily remove and store in the closet.
Preventing Pillow Avalanche (The Headboard Solution)
Pillows constantly slide down or fall behind the bed? Here are fixes:
- Angle back 10-15 degrees: Don’t stand them perfectly vertical—lean them slightly toward the headboard for stability
- Use pillow props: Wedge-shaped pillow supports (available on Amazon) sit behind euro shams and create a stable platform
- Grippy sham backs: Choose shams with textured backs (velvet, linen, canvas) rather than smooth satin or silk
- Bed rail clips: Small clips attach to the mattress and hold pillows in place (invisible solution)
- Accept imperfection: In real life, pillows shift. Readjust when you make the bed each morning and move on
Seasonal Pillow Swaps: Refreshing Your Space 4x a Year
One of the most cost-effective ways to keep your home feeling current is seasonal pillow swaps. Rather than buying new furniture or repainting, changing pillow covers quarterly transforms your space with minimal investment. Here’s how to build a year-round rotation system. Just as you might adapt your bedding with seasonal blankets, pillows should shift to match the temperature and mood of each season.
Building Your Seasonal Rotation (The Investment Strategy)
Instead of buying complete pillow sets four times per year, build a core system that rotates:
Year 1 Investment Plan
- Core neutrals (permanent): 4-6 high-quality neutral pillow inserts in your most-used sizes (20×20″, 22×22″). These stay year-round and never change. Budget: $100-150.
- Spring covers: 2-3 seasonal covers in spring colors. Budget: $40-60.
- Summer covers: 2-3 seasonal covers in summer colors. Budget: $40-60.
- Fall covers: 2-3 seasonal covers in fall colors. Budget: $40-60.
- Winter covers: 2-3 seasonal covers in winter colors. Budget: $40-60.
Total first-year investment: $260-390 for a complete rotation system that lasts 5-10 years.
Year 2+ Strategy
Now that you have inserts and base seasonal covers, only buy 1-2 new accent covers per season to refresh trends or replace worn items. Annual budget: $60-100.
💡 The 6-Pillow Minimum System
For maximum flexibility with minimal investment, build your system around 6 pillows:
- 4 pillows with interchangeable seasonal covers (these rotate 4x/year)
- 2 pillows in year-round neutrals that never change (anchors)
This approach gives you seasonal variety while maintaining visual continuity through your anchor pillows. Total cover investment: 4 covers × 4 seasons = 16 covers + 2 permanent = 18 covers to own. Sounds like a lot, but covers fold flat and store in a single under-bed bin.
Spring Pillow Palette (March-May)
Color story: Fresh, light, optimistic—think new growth and blooming gardens
Primary colors: Blush pink, mint green, soft yellow, lavender, cream
Accent colors: Coral, lilac, seafoam, buttercream
Patterns: Florals (small to medium scale), watercolor prints, delicate stripes, botanical line drawings
Textures: Lightweight linen, cotton, soft jersey knits, minimal embroidery
Avoid: Heavy textures (faux fur, chunky knits), dark colors (navy, charcoal, burgundy), winter metallics (silver)
Spring Styling Formula
- 2 soft neutral pillows (cream linen, light gray cotton)
- 2 pastel accent pillows (blush velvet, mint geometric)
- 1-2 floral or botanical pattern pillows
Pinterest-worthy spring combo: Cream linen + blush velvet + soft green watercolor floral + white embroidered detail
Summer Pillow Palette (June-August)
Color story: Vibrant, coastal, energetic—beach vacation vibes
Primary colors: White, navy, turquoise, coral, citrus yellow
Accent colors: Hot pink, lime green, orange, bright blue
Patterns: Stripes (especially navy/white), geometric shapes, tropical leaves, abstract ocean-inspired prints
Textures: Crisp cotton, outdoor-grade fabric, lightweight canvas, smooth linen
Avoid: Heavy fabrics (velvet, wool, thick knits), warm earth tones (rust, burgundy, mustard), autumnal patterns
Summer Styling Formula
- 2 white or cream base pillows (crisp cotton or linen)
- 2 navy or blue pillows (stripes or solid)
- 1-2 bright accent pillows (coral, turquoise, yellow)
Pinterest-worthy summer combo: White cotton + navy stripe + coral geometric + turquoise solid velvet
Fall Pillow Palette (September-November)
Color story: Warm, cozy, harvest-inspired—sweater weather arrives
Primary colors: Rust/terracotta, mustard yellow, olive green, camel, burgundy
Accent colors: Deep plum, burnt orange, forest green, chocolate brown
Patterns: Plaid, buffalo check, leaf prints, abstract warm tones, tribal/global patterns
Textures: Velvet, chunky knit, boucle, faux suede, wool blends
Avoid: Cool tones (icy blue, mint, lavender), summer brights (hot pink, turquoise), lightweight fabrics
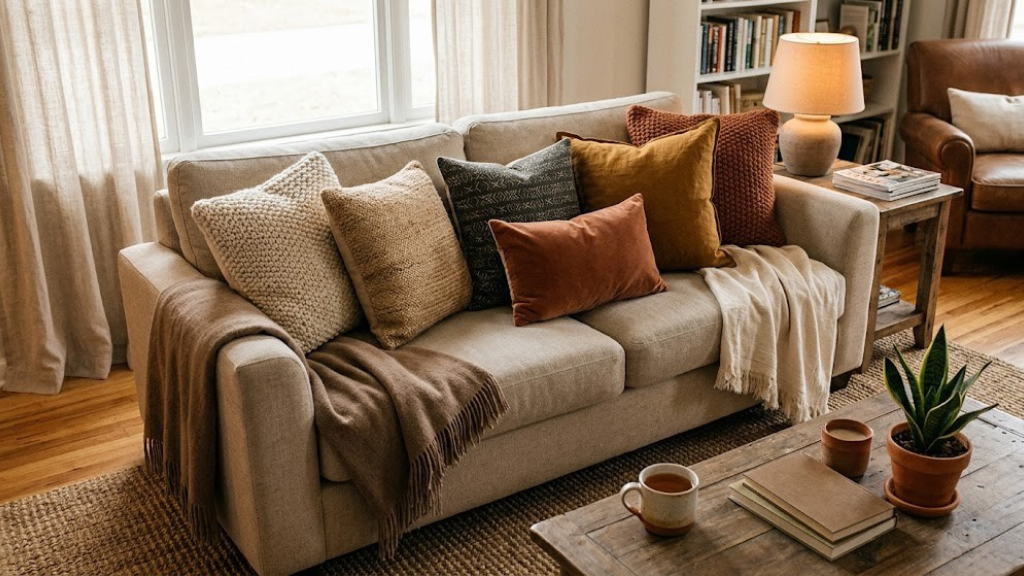
Fall Styling Formula
- 2 warm neutral pillows (camel, taupe, cream with warm undertones)
- 2 rich jewel tone or earth tone pillows (rust velvet, mustard knit)
- 1-2 textured or plaid accent pillows
Pinterest-worthy fall combo: Cream chunky knit + rust velvet + mustard buffalo check + olive green textured linen
Winter Pillow Palette (December-February)
Color story: Moody, sophisticated, luxurious—hibernation mode activated
Primary colors: Charcoal, deep navy, emerald green, burgundy, cream
Accent colors: Silver, icy blue, white, gold, deep plum
Patterns: Fair Isle knits, snowflake motifs (holiday only), geometric metallics, tone-on-tone damask
Textures: Faux fur, velvet, sherpa, cable knit, chenille, boucle
Avoid: Warm earth tones (rust, mustard, terracotta), lightweight fabrics, bright summery colors
Winter Styling Formula
- 2 plush texture pillows (faux fur, sherpa, chunky knit)
- 2 rich dark pillows (navy velvet, charcoal chenille)
- 1-2 metallic or icy accent pillows (silver, white, cream)
Pinterest-worthy winter combo: Charcoal velvet + cream faux fur + navy cable knit + silver metallic lumbar
| Season | Temperature Feel | Texture Priority | Pattern Energy | Storage Tip |
|---|---|---|---|---|
| Spring | Cool & Fresh | Lightweight, breathable | Delicate, romantic | Vacuum-seal pastels to prevent yellowing |
| Summer | Crisp & Airy | Smooth, cooling | Bold, graphic | Store in breathable cotton bags |
| Fall | Warm & Cozy | Medium weight, soft | Grounded, earthy | Cedar sachets prevent mustiness |
| Winter | Plush & Luxurious | Heavy, insulating | Moody, sophisticated | Brush faux fur before storing |
Seasonal Swap Timing
When exactly should you swap? Here’s the realistic schedule:
- Spring swap: First weekend of March (before spring equinox)
- Summer swap: Memorial Day weekend (unofficial start of summer)
- Fall swap: Labor Day weekend (after last beach trip, before school starts)
- Winter swap: Day after Thanksgiving (when holiday decorating begins)
These dates align with natural lifestyle transitions—weather changes, holidays, seasonal activities. They’re also long weekends, giving you time to swap and clean.

Seasonal Pillow Storage System
4-compartment under-bed organizer for seasonal rotation. Breathable fabric, cedar lining, labeled dividers. Fits 20-24 pillow covers.
Shop Storage Solutions →Transition Season Flexibility
Live in a climate without extreme seasons? Create a simplified two-season rotation:
Warm Season (March-September)
Combine spring + summer palettes: whites, blues, soft pastels, lightweight textures
Cool Season (October-February)
Combine fall + winter palettes: rich jewel tones, earth tones, plush textures
This approach works in temperate climates (Southern California, Florida, Texas, Southwest) where temperature swings are moderate and you don’t need four distinct seasonal moods.
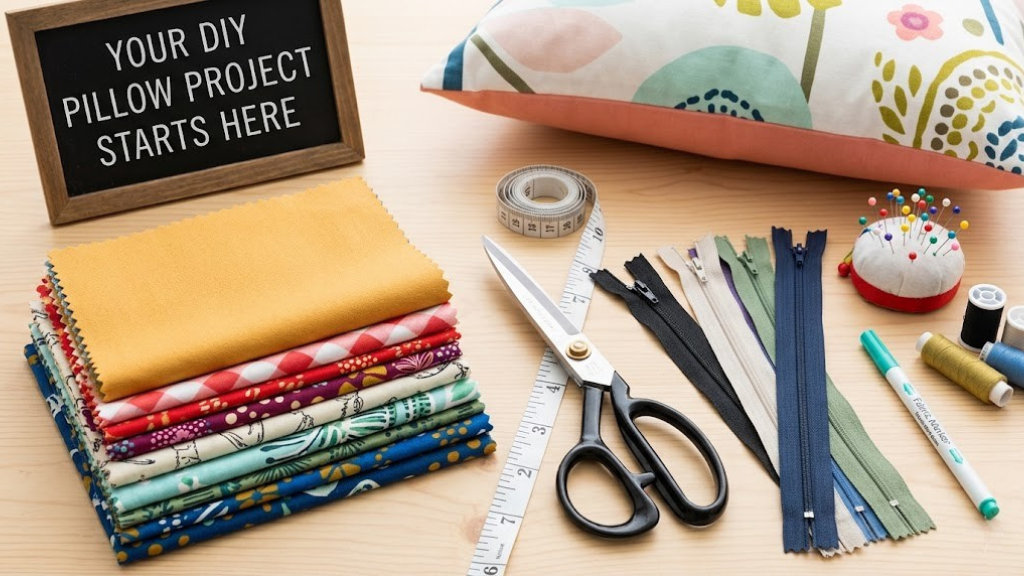
DIY Pillow Cover Projects: No-Sew, Basic Sew, and Advanced Techniques
Making your own pillow covers is one of the highest-ROI DIY projects in home decor. Store-bought covers range from $15-80 each; DIY covers cost $5-20 in materials and take 30 minutes to 2 hours depending on skill level. Over the course of decorating your home, this saves hundreds to thousands of dollars.
Method 1: No-Sew Envelope Fold (15 Minutes, $5-10)
Skill level: Absolute beginner—zero sewing required
Materials needed:
- Fabric (1 yard for 18×18″ pillow, 1.5 yards for 22×22″)
- Fabric scissors or rotary cutter
- Ruler or measuring tape
- Iron-on hem tape (optional for cleaner edges)
- Safety pins or fabric glue (for closure)
Step-by-Step Instructions
- Measure your pillow insert: Add 1 inch to each dimension. For an 18×18″ insert, cut fabric to 19×40″ (the extra length creates the envelope overlap).
- Create hem (optional): Fold each short edge over 1/2 inch, then 1/2 inch again. Use iron-on hem tape to seal, or leave raw if using non-fraying fabric like felt.
- Fold envelope: Lay fabric face down. Fold one hemmed edge toward the center (covering about 60% of the fabric). Fold the opposite edge over to overlap by 4-6 inches.
- Secure sides: Use fabric glue along the two open side edges. Let dry 2-4 hours. Alternative: use safety pins spaced 2 inches apart (visible but removable for washing).
- Turn right-side out: Flip cover so the pretty side faces out. Insert pillow through the envelope opening.
Best fabrics for no-sew: Canvas, duck cloth, felt, thick cotton, pre-quilted fabric (won’t fray)
Avoid: Silk, satin, loosely woven fabrics (they fray immediately without stitching)
💰 Budget Fabric Sources
- Thrift store tablecloths: $2-5 for enough fabric for 2-3 pillow covers. Look for interesting patterns in the linens section.
- Clearance quilting cotton: Fabric stores mark down seasonal prints 50-70% off. Stock up during clearance cycles.
- Old clothes: Oversized men’s flannel shirts make great fall pillow covers. Sweaters can be felted (washed hot, dried hot) and cut without fraying.
- Drop cloths: Painter’s canvas drop cloths ($8 at hardware stores) are pre-hemmed and perfect for neutral, farmhouse-style pillows. Can be dyed or stenciled.
Method 2: Basic Sew with Zipper (45 Minutes, $8-15)
Skill level: Beginner with basic sewing machine knowledge
Materials needed:
- Fabric (1 yard for 18×18″, 1.25 yards for 22×22″)
- Zipper (14-16″ minimum length)
- Sewing machine + thread
- Pins
- Scissors
- Zipper foot (usually comes with sewing machine)
Step-by-Step Instructions
- Cut fabric: For 18×18″ pillow, cut two 19×19″ squares (1/2 inch seam allowance on all sides).
- Install zipper: Place fabric squares right sides together. Sew 2 inches from each corner along one edge, leaving 14-inch opening in center. Press seam open. Center zipper face-down over seam. Pin in place. Using zipper foot, stitch zipper in place along both sides.
- Open zipper halfway: CRITICAL STEP—if you forget this, you won’t be able to turn the cover right-side out.
- Sew remaining sides: Pin remaining three sides. Sew with 1/2 inch seam allowance. Backstitch at beginning and end for strength.
- Clip corners: Cut diagonally across each corner (don’t cut through stitching). This reduces bulk and creates crisp corners when turned.
- Turn and press: Turn right-side out through zipper opening. Use a chopstick or turning tool to push out corners. Press with iron.
Time-saving tip: Buy pre-cut fabric squares in quilting sections (often sold as “charm packs” or “layer cakes”). They’re already cut to standard sizes and save cutting time.
Method 3: Upcycled Fabric Projects (30-60 Minutes, $0-5)
Transform existing textiles into pillow covers using materials you already own:
Project 1: Sweater Pillow (No-Sew)
- Use the torso section of an old wool or chunky knit sweater
- Turn inside out, lay flat, cut to pillow size + 1 inch
- Sew or glue three sides closed
- Insert pillow, sew or glue fourth side
- Bonus: The collar, cuffs, or button placket can become decorative details if incorporated
Project 2: Vintage Scarf Pillow
- Use square scarves (24×24″ or larger work best)
- Fold corners toward center to create envelope back
- Hand-stitch or glue corners in place
- Insert pillow
- Pro tip: Thrift stores often have bins of vintage scarves for $1-2 each
Project 3: Denim Pillow from Old Jeans
- Cut leg sections from jeans (use back pockets as decorative detail)
- Stitch two pieces together, leaving opening for insert
- Add embellishments: studs, embroidery, fabric paint
- Style note: Works great for casual, rustic, or teen rooms
Advanced Techniques for Experienced Sewers
Piping and Trim
Add piping (cording sewn into seams) for a professional, polished finish. This elevates basic pillows to designer-quality:
- Purchase pre-made piping or make your own using bias tape + cording
- Baste piping to pillow front before attaching back
- Use contrasting color piping for bold definition
- Cost add: $3-5 per pillow for materials, adds 15 minutes to project time
French Seams (For Sheer or Delicate Fabrics)
Creates enclosed seams with no raw edges—essential for silk, organza, or lightweight fabrics:
- Sew seam wrong sides together with 1/4 inch allowance
- Trim to 1/8 inch
- Fold right sides together, press
- Sew with 3/8 inch allowance, enclosing raw edges
Quilted Pillow Fronts
Create textured, patchwork pillow fronts:
- Cut fabric scraps into 4×4″ or 5×5″ squares
- Sew squares together in grid pattern
- Add batting layer behind patchwork front
- Quilt using straight lines, diagonal lines, or free-motion patterns
- Attach to solid back as normal
- Time investment: 2-4 hours per pillow, but creates one-of-a-kind statement pieces
Washing and Care for DIY Covers
Handmade covers require slightly more care than store-bought:
- Pre-wash fabric: Always wash and dry fabric before sewing to account for shrinkage. Skip this step and your finished cover may shrink 1-2 sizes after first wash.
- Zipper protection: Close zippers before washing to prevent snagging. Wash inside-out.
- Glued covers: Hand wash only in cold water. Fabric glue weakens in hot water and agitation.
- Embellished covers: Anything with beads, sequins, or heavy embroidery should be spot-cleaned or dry cleaned.
Budget Shopping Strategies: Where to Find Cute Pillows Without Breaking the Bank
You don’t need a designer budget to create Pinterest-worthy pillow arrangements. The secret is knowing where to shop, when to shop, and which items are worth investing in versus where to save. Here’s the insider strategy for building a high-end look on a low-end budget.
The 70/30 Investment Rule
Professional stylists follow this ratio: spend 70% of your budget on high-quality pillow inserts, 30% on covers. Why? Inserts determine how pillows look and feel for years. Covers are cosmetic—swappable, seasonal, trend-driven. A $50 down-alternative insert inside a $12 Target cover looks infinitely better than a $10 polyester insert inside a $60 designer cover.
Smart Investment Allocation (6-Pillow Setup)
- Inserts (70%): 6 quality inserts @ $20-25 each = $120-150
- Covers (30%): 6 covers @ $10-20 each = $60-120
- Total: $180-270 for a complete professional-looking arrangement that lasts 3-5 years
Compare to buying cheap pre-filled pillows: 6 pillows @ $15-25 each = $90-150. Seems cheaper initially, but they flatten within 6-12 months, requiring full replacement. The insert investment pays for itself within 2 years.
Where to Buy: Store-by-Store Strategy
Target (Sweet Spot for Trend-Forward Covers)
Best for: Seasonal accent covers, trendy patterns, budget-friendly basics
Price range: $10-35 per cover
When to shop: End-of-season clearance (75% off), Threshold brand sales
What to buy: Covers only, never inserts (they use cheap poly-fill)
Pro tip: Target’s Opalhouse and Project 62 lines photograph beautifully—Instagram-worthy at a fraction of designer prices
Amazon (Best for Inserts and Bulk Buying)
Best for: Down-alternative inserts, bulk cover sets, basic neutrals
Price range: Inserts $15-30, covers $8-25
When to shop: Prime Day, Black Friday, January white sales
What to buy: INVEST in quality inserts (Foamily, Utopia Bedding brands). Buy multi-packs of covers for better per-unit pricing.
Warning: Photos can be misleading. Always read reviews for color accuracy and fabric quality.
HomeGoods/TJ Maxx/Marshalls (Treasure Hunt Shopping)
Best for: Designer brands at 50-70% off, unique patterns, high-end textures
Price range: $12-40 for covers that retail $40-120
When to shop: Weekday mornings (best selection before picked over)
What to buy: Anything designer (look for Calvin Klein, Kate Spade, Frette, Tommy Hilfiger tags at fraction of retail)
Strategy: If you see something you love, buy it immediately—inventory changes daily and items don’t restock
H&M Home (European Style, Budget Prices)
Best for: Scandinavian minimalism, linen textures, seasonal collections
Price range: $8-30 per cover
When to shop: Online clearance section (items as low as $4)
What to buy: Linen and linen-blend covers, neutral solids, simple stripe patterns
Caution: Sizing runs European—an H&M 20×20″ cover may actually fit an 18×18″ insert. Always check actual measurements in cm.
IKEA (Unbeatable Price-to-Quality Ratio)
Best for: Basic neutrals, large quantities, kids’ rooms
Price range: $5-20 per cover
What to buy: Solid-color covers in bulk, basic patterns, washable kid-friendly options
Skip: Their inserts (very budget-quality poly-fill that flattens quickly)
Hack: Buy IKEA covers at $7-12 each, pair with $20 Amazon inserts—total $27-32 per pillow with luxury fullness
| Store | Best Month to Shop | Average Savings | Must-Buy Items |
|---|---|---|---|
| Target | January, July (clearance) | 50-75% off seasonal | Opalhouse covers, seasonal accents |
| Amazon | July (Prime Day), November | 30-40% off regular | Down-alternative inserts, bulk sets |
| HomeGoods | Year-round rotation | 60-70% off retail | Designer brands, luxury textures |
| H&M Home | Online clearance anytime | 50-70% off clearance | Linen covers, minimalist solids |
| IKEA | As-Is section visits | Consistent low prices | Basic neutral covers |
Thrift Store and Secondhand Strategy
Thrifting pillow covers is hit-or-miss, but when you hit, the savings are unbeatable. Here’s how to shop smart:
What to Look For
- Brand names: Crate & Barrel, Pottery Barn, West Elm tags at 90% off retail
- Natural fibers: 100% cotton, linen, wool (synthetic blends age poorly)
- Hidden zippers: Indicates quality construction and easy washing
- Stain-free whites/creams: These are goldmines—neutrals never go out of style
What to Skip
- Visible stains or odors: Not worth the cleaning effort
- Broken zippers: Replacement costs more than new budget covers
- Dated patterns: Unless ironically vintage (70s florals having a moment), avoid 90s/2000s prints
- Pet hair embedded: Indicates home with pets—likely odors you can’t smell in-store will emerge at home
Cleaning Thrifted Covers
Always wash thrifted items before use:
- Pre-soak in hot water + 1 cup white vinegar (kills bacteria, removes odors)
- Wash in hot water with detergent + 1/2 cup baking soda
- Air dry in sunlight (natural bleaching and freshening)
- If odors persist, repeat with enzyme-based pet odor remover

Budget Pillow Cover Starter Set
Curated 6-pack of Amazon bestsellers under $15 each. Coordinated neutrals + 2 accent colors. Ships Prime.
Shop Budget Bundles →The “One Splurge” Strategy
In every pillow arrangement, invest in ONE statement pillow at a higher price point ($50-80) and surround it with budget options. This creates the illusion of a fully high-end setup while spending 70% less overall.
Example Budget Breakdown (6 Pillows)
- 1 splurge pillow: $60 designer velvet with embroidery (focal point)
- 2 mid-range pillows: $20 each = $40 (coordinate with splurge color)
- 3 budget pillows: $12 each = $36 (neutrals, textures)
- Total: $136 for an arrangement that looks $300+
The splurge pillow draws the eye. Guests assume everything else is equally expensive. In reality, only 1/6 of your budget went to that one item.
Sales Calendar: When to Buy What
Retailers follow predictable discount cycles. Time your purchases right and never pay full price:
- January: White sales (sheets, bedding, home textiles) = best pillow prices of the year
- April/May: Spring clearance as stores make room for summer inventory
- July: Amazon Prime Day, Target Circle Week = deep discounts on home goods
- September: Back-to-school dorm sales = twin/small pillow deals
- November: Black Friday week = year’s second-best home textile sales
- December 26-31: Post-holiday clearance = best time for holiday-themed accent pillows at 70-90% off
Pro strategy: Buy next season’s pillows at end-of-season clearance. Buy summer styles in September for 75% off, store until next June. Buy fall styles in January for 70% off, store until next September.
Common Styling Mistakes (And How to Fix Them)
Even with the best intentions, certain pillow styling errors sabotage your space. Here are the most common mistakes and their solutions.
Mistake 1: All Pillows Are the Same Size
The problem: Five 18×18″ pillows in a row look like a uniform lineup, not a curated arrangement. There’s no visual hierarchy or depth.
The fix: Always vary sizes. Use at least two different sizes, ideally three. Follow the layering principle: large in back, medium in middle, small/lumbar in front. This creates dimensional interest even if all pillows are the same color.
Quick fix: If you already own same-size pillows, add two larger pillows to the back corners and two smaller accent or lumbar pillows to the front. Suddenly your 5-pillow boring lineup becomes a 9-pillow layered arrangement.
Mistake 2: Perfect Symmetry (Too Rigid)
The problem: Mirrored placement on both sides—exact same pillow in exact same position left and right—looks hotel-generic or staged rather than lived-in.
The fix: Aim for balance, not symmetry. Use similar but not identical elements on each side. Example: left corner gets navy solid, right corner gets navy stripe. Both navy, both in corners, but slight variation prevents rigid feel.
Advanced technique: Use odd numbers per section. Instead of 2+2+2 (too even), do 2+3+2 or 3+2+2. The asymmetry feels organic and intentional.
Mistake 3: Matching Pillow Color to Couch Exactly
The problem: Gray pillows on a gray couch blend together and disappear. The arrangement lacks contrast and reads as unfinished.
The fix: Use the couch color as your base (in 1-2 pillows maximum) but introduce contrasting or complementary colors for the majority. If you have a gray couch, 2 gray pillows are fine, but the other 3-5 should be cream, navy, blush, mustard, or other coordinating colors that pop against the gray.
Exception: All-neutral monochromatic schemes work if you vary TEXTURE heavily. All-gray pillows in different materials (velvet, linen, cable knit, faux fur) create interest through tactile variation rather than color.
Mistake 4: Too Many Patterns (Visual Chaos)
The problem: Five different bold patterns fighting for attention—florals, stripes, geometrics, animal prints, and plaids all together. The eye doesn’t know where to focus.
The fix: Follow the three-pattern rule (see Section 3). Maximum three pattern types, always varied in scale. The rest should be solids or subtle textures. If you have four patterns you love, rotate them seasonally rather than displaying all at once.
Rule of thumb: No more than 50% of your pillows should be patterned. If you have 6 pillows, 3 patterned + 3 solid/textured is the upper limit. Safer ratio: 2 patterned + 4 solid/textured.
Mistake 5: Flat, Under-Filled Pillows
The problem: Sad, deflated pillows with visible corners gaps. This screams “cheap” even if the covers are expensive.
The fix: Size up your inserts (the “2 inches larger” rule from Section 1). A 20×20″ cover with a 22×22″ insert looks plump and luxurious. A 20×20″ cover with an 18×18″ or 20×20″ insert looks sad and budget.
Additional fix: Replace poly-fill inserts with down-alternative. The extra $10-15 per insert transforms the entire look. Fluff daily by karate-chopping the center and shaking vigorously.
Mistake 6: Ignoring Scale (Tiny Pillows on Huge Couch)
The problem: Four 14×14″ pillows on an oversized sectional look like decorative afterthoughts rather than intentional styling.
The fix: Match pillow scale to furniture scale. Large couches need 20×20″ to 24×24″ pillows as anchors. Small loveseats need 18×18″ to 20×20″ maximum. The pillow should fill approximately 1/3 of the seating depth.
✓ Proportional Pairings
- 90″ sectional: 22×22″ + 20×20″ pillows
- 84″ standard sofa: 20×20″ + 18×18″ pillows
- 60″ loveseat: 18×18″ + 16×16″ pillows
- 48″ settee: 16×16″ + 14×14″ pillows
✗ Unbalanced Pairings
- Sectional with 16×16″ pillows (too small)
- Loveseat with 24×24″ pillows (too large)
- Deep couch with 12×12″ pillows (lost visually)
- Shallow bench with 22×22″ pillows (overpowering)
Mistake 7: Forgetting About Functionality
The problem: Nine decorative pillows on a family room couch that gets daily use. Reality: they end up in a pile on the floor because no one wants to move them every time they sit.
The fix: Be realistic about room function. Family rooms, dens, and TV-watching spaces should max out at 3-5 pillows that provide actual back support. Formal living rooms or guest bedrooms can handle 7-9 purely decorative pillows because they’re used less frequently.
Lifestyle alignment:
- Young kids in house: 3-4 washable covers maximum
- Pets allowed on furniture: 4-5 durable, pet-hair resistant covers
- Empty nesters/no kids: Go wild with 7-9 decorative layers
- Daily use room: Function over form—3-5 supportive pillows
Mistake 8: Never Changing or Refreshing
The problem: The same five pillows, same positions, same colors for three years straight. The space feels stale and dated.
The fix: Even if you don’t fully swap seasonally, rotate positions quarterly, add one new accent pillow twice a year, or switch out one pattern. Small changes keep spaces feeling current without major investment.
Minimal refresh tactics:
- Swap pillow positions left to right
- Rotate which pillow is in front vs. back
- Add one new trendy color (2026: boucle texture, sage green, terracotta) while keeping others the same
- Replace one solid pillow with a new pattern every 6 months
Pinterest Trends 2026: What’s Saving, Sharing, and Going Viral
Pinterest drives home decor trends more than any other platform. Here are the pillow styling themes dominating saves and repins in 2026, plus how to recreate them affordably.
Trend 1: Boucle Everything
The look: Nubby, looped texture fabric in neutral tones—cream, oatmeal, natural, light gray. Boucle adds dimension without pattern, fitting the “quiet luxury” aesthetic.
How to recreate:
- Target Opalhouse collection has boucle-look pillows for $25-35
- Amazon search “boucle pillow cover” yields options $18-30
- DIY: Use boucle fabric from fabric stores ($20-30/yard) to make your own covers
Styling formula: 2 boucle cream pillows + 1 smooth velvet accent + 1 linen neutral + 1 lumbar in rust or sage. The boucle provides texture, other elements prevent it from reading too rustic. Explore similar textural approaches in chenille fabric choices for complementary pieces.

Trend 2: Oversized Lumbar Pillows
The look: Lumbar pillows sized 14×36″, 16×26″, or even 12×40″—significantly longer than traditional 12×20″ lumbars. These create horizontal emphasis and modern sophistication.
How to recreate:
- Search “extra long lumbar pillow” on Amazon—many options $25-45
- Etsy has custom-size options if you can’t find pre-made
- Use as the centerpiece of a 5-pillow couch arrangement: 2 square corners + oversized lumbar center + 2 smaller accents in front
Best patterns for oversized lumbars: Horizontal stripes (enhance the length), single-color gradients, simple line art, or textured solids. Avoid busy patterns—they look chaotic on large surfaces.
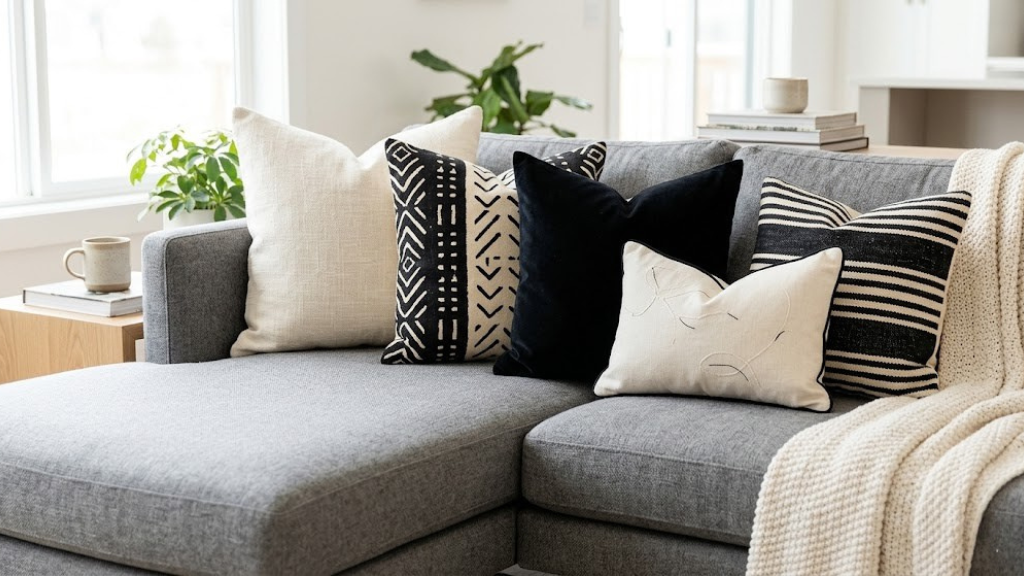
Trend 3: High-Contrast Black + Cream
The look: Stark black and white pairings—no grays, no in-between tones. Graphic, modern, Pinterest catnip.
How to recreate:
- 2 black velvet square pillows (corners)
- 2 cream chunky knit or boucle pillows (middle layer)
- 1 black-and-cream geometric pattern lumbar (front)
Warning: This trend is bold and may tire quickly. Consider it for accent spaces (reading nooks, guest rooms) rather than main living areas unless you’re committed to the stark aesthetic long-term.
Trend 4: Vintage Floral on Neutral Backgrounds
The look: Grandmillennial style—large-scale vintage florals (think 1970s wallpaper vibes) on cream or white backgrounds, mixed with modern neutrals.
How to recreate:
- Thrift stores are goldmines for actual vintage floral pillows
- Target, H&M Home, and Anthropologie all have modern takes on vintage florals
- Pair 1-2 bold floral pillows with 4-5 solid cream, tan, or soft pink pillows to balance the pattern intensity
Color palettes winning on Pinterest: Rust + cream florals, dusty blue + cream, pink + green botanical prints
Trend 5: Chunky Knit Texture Overload
The look: Cable knit, waffle weave, and chunky hand-knit textures in every neutral shade. Emphasizes tactile comfort and cozy hygge vibes.
How to recreate:
- Mix knit textures: cable knit + waffle weave + smooth velvet
- Stay monochromatic (all creams or all grays) and let texture create all the interest
- Budget option: Old sweaters upcycled into pillow covers (see DIY section)
Best for: Fall/winter styling, bedrooms, reading nooks. Less practical for high-traffic family rooms (knits snag and pill quickly with heavy use).
🌾 Earthy Neutrals
Cream, tan, terracotta, olive green—nature-inspired palette with organic textures. Jute, linen, boucle fabrics dominating.
🎨 Color Blocking
Solid-color pillows in bold, contrasting pairs: rust + navy, pink + green, mustard + charcoal. No patterns, all impact through color.
🌿 Botanical Line Art
Simple black-line leaf drawings on cream backgrounds. Minimalist, modern, works in any style home. Easy to DIY with fabric markers.
✨ Velvet Jewel Tones
Emerald, sapphire, ruby, amethyst velvet pillows on neutral couches. Luxe hotel vibes, especially with gold metallic accents.
Trend 6: Asymmetrical Arrangements (Breaking Symmetry)
The look: Intentionally uneven pillow distribution—3 pillows on one side, 2 on the other. Diagonal lines, varied heights, “designed mess” aesthetic.
How to recreate:
- Left corner: 22×22″ + 20×20″ + 18×18″ stacked and overlapping
- Right corner: 22×22″ + lumbar leaning against it
- Creates dynamic diagonal line across couch
Requires: Good spatial awareness and willingness to break traditional rules. Not for perfectionists who like matched pairs.
Trend 7: Sustainable and Upcycled Materials
The look: Organic cotton, hemp, recycled polyester, vintage fabric patchwork. Ethical consumerism meets aesthetics.
How to recreate:
- Search for GOTS-certified organic cotton covers
- Use vintage fabrics from thrift stores (authentic sustainability)
- Etsy has many small-batch makers using upcycled textiles
- Create patchwork covers from fabric scraps (see DIY section)
Bonus: Sustainable options often photograph beautifully with natural, imperfect textures that look high-end and artisanal.
Storage & Care Tips: Keeping Pillows Fresh and Organized
Even the most beautiful pillow arrangement fails if covers are stained, inserts are flattened, or seasonal storage creates mildew. Proper care extends the life of your investment and keeps everything Pinterest-ready year-round.
Daily Maintenance (2 Minutes)
Fluffing Technique
Daily fluffing prevents permanent flattening and maintains that plump, professional look:
- Karate chop: Strike the center of the pillow with the side of your hand to break up compressed fill
- Shake vigorously: Hold opposite corners and shake 10-15 times to redistribute fill
- Punch corners: Use your fist to push fill into corners, eliminating gaps
- Rotate: Flip pillows 180 degrees weekly to even out wear
Best time: When making the bed or tidying the living room each morning. Takes 30 seconds per pillow.
Spot Cleaning
Address spills immediately before they set:
- Blot, don’t rub: Rubbing pushes stains deeper into fibers
- Cold water first: Most stains respond to cold water + mild dish soap
- White cloth only: Colored cloths can transfer dye to light fabrics
- Air dry: Heat from dryers sets stains permanently
Deep Cleaning Schedule
| Item | Frequency | Method | Notes |
|---|---|---|---|
| Pillow Covers (High-Traffic) | Every 3 months | Machine wash cold, gentle cycle | Turn inside-out, close zippers |
| Pillow Covers (Low-Traffic) | Every 6 months | Machine wash or spot clean | Decorative bedroom pillows need less |
| Down/Down-Alt Inserts | Annually | Machine wash warm, 2 rinse cycles | Dry with tennis balls, low heat |
| Polyester Inserts | Every 6 months | Machine wash warm | Air dry or low heat |
| Velvet Covers | Dry clean or hand wash | Steam to refresh between washes | Machine washing crushes pile |
| Embellished Covers | Spot clean only | Professional clean if needed | Beads, sequins damage in machines |
Seasonal Storage Solutions
When rotating seasonal covers, proper storage prevents damage, odors, and space waste:
Option 1: Under-Bed Storage (Best for Most Homes)
- Container type: Breathable fabric bins with zippered lids (not plastic—traps moisture)
- Organization: Separate compartments for each season (Spring, Summer, Fall, Winter)
- Prep before storing: Wash all covers, air dry completely (any moisture = mildew risk)
- Add protection: Cedar sachets or lavender bags deter moths and add fresh scent
- Label clearly: “Fall 2026” so you’re not digging through bins next year
Option 2: Vacuum-Seal Bags (For Space-Constrained Homes)
- Pros: Compresses covers to 1/3 size, protects from dust and pests
- Cons: Can crush textures (velvet pile, embroidery), wrinkles fabrics
- Best for: Flat weaves (cotton, linen), knits that bounce back
- Avoid for: Velvet, faux fur, heavily embellished covers
Option 3: Closet Hanging Organizers
- Pros: Keeps covers wrinkle-free, easy to see what you have
- Cons: Takes up closet rod space
- Best for: Delicate or dry-clean only covers you don’t want folded
🧼 Pre-Storage Wash Recipe
Before putting covers into seasonal storage, wash with this formula to ensure freshness when you retrieve them:
- Regular detergent (follow bottle instructions)
- 1/2 cup white vinegar (kills bacteria, removes odors)
- 1/4 cup baking soda (brightens, deodorizes)
- Cold water cycle for colors, warm for whites
- Air dry in sunlight (natural bleaching effect) or low-heat dryer
This combo eliminates any lingering body oils, perfumes, or pet odors that could set during months of storage.
Odor Prevention and Removal
Pillows absorb smells from pets, cooking, smoking, and body contact. Here’s how to keep them fresh:
Prevention
- No eating on the couch rule: Food smells permeate fabric quickly
- Pet-free zones: If possible, keep pets off furniture with decorative pillows (or use washable covers)
- Outdoor airing: Hang pillows outside quarterly for 2-4 hours—UV rays kill bacteria and freshen naturally
- Fabric spray: Use Febreze or homemade spray (water + vodka + essential oil) between washes
Removal (For Embedded Odors)
- Baking soda treatment: Sprinkle liberally over pillow surface, let sit 8-12 hours, vacuum thoroughly
- Vinegar soak: For washable covers, soak in sink with 1:1 water/white vinegar for 30 minutes before washing
- Enzyme cleaner: Pet odors require enzyme-based products (Nature’s Miracle, Rocco & Roxie)—regular detergent won’t break down organic compounds
- Sunlight exposure: After treating, hang in direct sunlight for 4+ hours—sun naturally neutralizes odors
Extending Insert Lifespan
Inserts are your biggest investment—$20-80 each. Make them last 5-10 years with these tactics:
- Daily fluffing: Already covered, but bears repeating—this is the #1 lifespan extender
- Proper cover fit: Overstuffed is good, but TOO tight (3+ inches smaller cover) stresses seams and causes blowouts
- Seasonal dryer refresh: Once per season, tumble inserts on low heat with 3-4 tennis balls for 20 minutes—redistributes fill and restores loft
- Rotation: If you have extra inserts, rotate them between high-use and low-use pillows quarterly to even out wear
- Repair, don’t discard: Small insert tears can be sewn shut. A $3 hand-sewing fix beats replacing a $25 insert
When to Replace vs. Refresh
Replace inserts when:
- Fluffing no longer restores shape (permanently compressed)
- Fill has migrated to corners and won’t redistribute (lumpy)
- Fabric covering insert has torn in multiple places (can’t repair)
- Odors persist after multiple wash cycles (especially if down/feather—means oils have broken down)
- Age: polyester after 1-2 years, down-alternative after 3-4 years, down after 5-10 years
Refresh covers when:
- Fabric has pilled but is otherwise intact (use fabric shaver tool)
- Color has faded slightly (dye baths can restore, or embrace the vintage look)
- Zipper is broken but fabric is perfect (replace zipper for $5-10 at tailor)
- You’re just bored with them (rotate to guest room or donate rather than trash)
Frequently Asked Questions About Decorative Throw Pillows
How many throw pillows should I put on my couch?
For a standard 3-seat sofa, 5-7 pillows create a balanced, layered look. Start with two 22-inch pillows in the corners, add two 20-inch pillows for the middle layer, and finish with 1-3 smaller lumbar or decorative pillows (12×20 inches). For smaller loveseats, use 3-5 pillows. The key is odd numbers and varied sizes to avoid a rigid, symmetrical appearance. Remember the “actually sit here” test—if you have to move more than 4 pillows to sit comfortably, you have too many for a functional space.
What’s the best pillow combination for a bed?
A classic bed pillow arrangement includes sleeping pillows (2-4 euro shams or standard shams at the back), followed by decorative pillows in decreasing sizes toward the front. For a king bed: 3 euro shams (26×26″), 2-3 standard shams (20×36″), and 1-2 accent pillows (20×20″ or lumbar). For a queen bed: 2-3 euro shams, 2 standard shams, and 1 accent pillow. Always layer from large to small, and use odd numbers for visual interest. The layers create depth and that hotel-luxury look that’s so popular on Pinterest.
How do I mix patterns on throw pillows without it looking chaotic?
Follow the 60-30-10 rule and three-pattern formula: 60% one dominant pattern (large-scale florals or geometric), 30% a medium-scale coordinating pattern, and 10% a small accent pattern or solid. Stick to a unified color palette of 3-4 colors. Mix pattern scales (large, medium, small) rather than combining similar-sized patterns—this is the most common mistake. Include at least one solid or textured pillow to give the eye a resting place. Never combine patterns of the same scale, as this creates visual competition rather than harmony.
What size throw pillow covers should I buy for standard couch pillows?
The most versatile throw pillow sizes for couches are 20×20 inches and 22×22 inches. However, here’s a professional secret: for a full, plump look, buy inserts 2 inches larger than your covers. This means a 22-inch insert for a 20-inch cover, or a 24-inch insert for a 22-inch cover. Lumbar pillows typically measure 12×20, 14×22, or 12×24 inches. Always measure your current pillow inserts before purchasing covers, and remember that the overstuffed approach prevents that sad, deflated pillow syndrome you see in poorly styled spaces.
Can I make my own DIY pillow covers without sewing?
Absolutely! No-sew pillow covers can be made using fabric glue, iron-on hem tape, or the envelope fold method with fabric ties. The easiest approach: cut fabric 1 inch larger than your pillow on all sides, use iron-on hem tape for edges, and add velcro strips or fabric ties for closure. Alternatively, use large scarves, vintage tablecloths, or tea towels folded and secured with safety pins or fabric knots. This no-sew envelope method takes just 15 minutes and costs $5-10 in materials. Best fabrics for no-sew projects are canvas, duck cloth, felt, or thick cotton that won’t fray without stitching.
How do I arrange decorative pillows on a bed so they don’t fall off?
Angle pillows slightly backward against the headboard (about 10-15 degrees) rather than standing them perfectly upright. Use heavier, larger pillows at the back for stability (euro shams), and lighter accent pillows in front. Choose pillow shams with textured backs (velvet, linen, canvas) rather than smooth satin or silk, as they grip the headboard better. For beds without headboards, use a wall-mounted ledge or arrange pillows in a stepped formation that leans into the wall. Consider pillow props—wedge-shaped supports that sit behind euro shams to create a stable platform.
What are the best colors for throw pillows that go with everything?
Neutrals are the most versatile base: cream, beige, gray, charcoal, and white work with virtually any decor style. Add depth with muted earth tones like terracotta, sage green, or dusty blue—these coordinate with most palettes without clashing. For accent pops that remain flexible, navy blue, mustard yellow, and blush pink work with most color schemes. Metallics (gold, silver, copper) add sophistication without competing for attention. Black and white geometric patterns provide contrast while remaining neutral enough to anchor any color scheme. The 60-30-10 rule applies here: 60% neutrals, 30% coordinating earth tones, 10% bold accents.
How often should I replace or wash throw pillow covers?
Wash removable pillow covers every 3-6 months for high-traffic areas (family room couches), or every 6-12 months for low-traffic decorative spaces (guest bedrooms). Most cotton, linen, and polyester covers are machine washable on gentle cycle—turn inside-out and close zippers before washing. Between washes, refresh pillows by airing them outdoors or using fabric refresher spray. Replace pillow inserts every 2-3 years as they flatten and lose shape—polyester inserts wear faster than down-alternative. Covers themselves can last 5-10 years with proper care, but consider seasonal swaps every 1-2 years to keep your space feeling current and intentional.
What’s the difference between a pillow cover and a pillowcase?
Pillowcases are designed for sleeping pillows with an open-end envelope or flap closure, usually made from breathable fabrics like cotton or linen for face contact. Pillow covers (also called pillow shams or throw pillow covers) are specifically for decorative pillows, featuring hidden zippers, envelope closures, or button backs to completely conceal the insert and create a seamless look. Covers often use heavier, more decorative fabrics like velvet, jacquard, boucle, or outdoor-grade textiles that wouldn’t be suitable for sleeping. The closure mechanisms differ too—pillowcases prioritize easy removal for frequent washing, while covers prioritize aesthetics since they’re changed less often.
Are funky or fun throw pillows worth the investment for rentals?
Yes, but with a smart strategy. Invest in neutral, high-quality inserts ($15-25 each) that you can keep long-term and take from rental to rental. Then swap inexpensive covers ($10-30) seasonally or when moving to personalize each space. This approach costs less than replacing entire pillows and allows you to adapt to different rental aesthetics without permanent changes. Focus on budget-friendly statement pieces from Target, H&M Home, Amazon, or thrift stores for covers, while keeping your base inserts consistent. When you move, pack the inserts (they’re your investment) and either take covers or donate them. Total cost: under $200 for a 6-pillow system that works anywhere.
How do I keep throw pillows fluffy and prevent them from going flat?
Daily maintenance is key: fluff pillows by karate-chopping the center and shaking vigorously to redistribute fill. This 30-second routine prevents permanent compression. Use down or down-alternative inserts rather than cheap polyester fiber-fill—they maintain loft much longer (3-5 years vs. 6-12 months). Store pillows upright rather than stacked flat to prevent compression. Rotate and flip pillows weekly to even out wear patterns. For heavily flattened pillows, tumble dry on low heat with 3-4 tennis balls for 15 minutes to redistribute fill. Replace inserts when fluffing no longer restores shape—typically after 2-3 years of daily use for down-alternative, 1-2 years for polyester fill.
What are the most Pinterest-worthy pillow styling trends for 2026?
Top Pinterest trends include: oversized lumbar pillows (16×26″ or 14×36″), high-contrast color blocking (black + cream, navy + rust), boucle and textured neutral fabrics, vintage-inspired florals on neutral backgrounds, geometric tribal patterns, and asymmetrical arrangements mixing 3-4 different sizes. Layered neutrals with one bold accent color dominate saves—think cream + taupe + rust, or gray + charcoal + mustard. Velvet mixed with chunky knits creates tactile interest. Sustainable materials like organic cotton, hemp, and upcycled fabrics are trending as conscious consumerism meets aesthetics. The “quiet luxury” aesthetic favors quality textures over loud patterns.
Transform Your Space with Perfect Pillow Styling
Mastering throw pillow styling is one of the most impactful, budget-friendly transformations you can make in your home. Whether you’re creating a cozy living room retreat, a Pinterest-worthy bedroom sanctuary, or refreshing your space seasonally, the principles in this guide give you the foundation to style with confidence.
Remember: there’s no single “right” way to arrange pillows. The best arrangement is one that feels authentic to your space, works with your lifestyle, and makes you happy every time you walk into the room. Start with the formulas and rules outlined here, then adapt them to your unique aesthetic and needs.
The beauty of pillow styling is that it’s low-risk experimentation. Don’t like a combination? Swap it out. Want to try a new trend? Buy one accent pillow rather than redecorating the entire room. Over time, you’ll develop an intuitive sense for what works in your space—color relationships that sing, texture combinations that add depth, and arrangements that feel effortlessly curated rather than overthought.
Your journey to magazine-worthy pillow styling starts with a single throw pillow. Which trend will you try first?
Start Your Pillow Makeover →